Monday, December 30, 2013

2013 Handmade Christmas Gifts - Part 1

University of Texas Longhorn Pillowcase - Part 1 of my handmade Christmas gifts for this year.

My husband graduated from UT Austin which is a big deal in Texas.  There are two major college systems in Texas - UT and Texas A & M.  The Longhorns and the Aggies.  There is a branch of one of those, and sometimes both, in just about every mid-sized/large city in Texas.  So, I wanted to make him a Longhorn pillowcase for his stocking this year - especially after I found this fabric on clearance at Hobby Lobby ;).

I used the AllPeopleQuilt.com million pillowcase tutorial.  This was the first time I had ever made a pillowcase but this tutorial was amazing and the pillowcase is super easy to make.  I don't think it will be the last time I use this tutorial.  I see pillowcases in the futures of everyone I know!  LOL
 
 Isn't it cute all rolled up?  He was surprised and impressed that I made it.  Yay!

For this tutorial, there are 2 pieces of fabric to cut.  The one problem that I had with this tutorial is that it didn't tell you which way to turn the outer band of fabric if it is a directional print.  So, of course, I turned mine the wrong way the first time I sewed it and had to rip it out.  I wanted the outer band to go in the same direction as the main fabric.
 So, if you have a directional piece of fabric for your band, it needs to go this way.  The band fabric goes upside down and the main fabric is right side up.  If you check out the tutorial, you'll see what I mean about placing the fabric this way.  It has lots of pictures and is so easy to follow.
 Here is my pillowcase all rolled up and I'm sewing it into the "tube".
 And tada!  I got it right!
 The tutorial explains how to do french seams so that there are no raw fabric edges.  It looks very professional.
 A perfect pillowcase.
 With fabric all going the right way.
I hope everyone had a very Merry Christmas.  Ours was quiet but nice.  Very low key.  There were only 5 of us and we had our traditional sandwiches - I'm not kidding, it really is a tradition.

Friday, December 6, 2013

Thanksgiving Day Wrap Up and My Newly Organized Fabric

I just had to show a couple of pics of my Thanksgiving table. 


 I don't usually have Thanksgiving at my house but since we did this year, I had to go out and buy a tablecloth and I also made some napkins.  Just quick and easy napkins - nothing fancy.  You can tell I should have put the tablecloth in the dryer or something to get the wrinkles out but I didn't.  It was made of some funky cheap fabric and I was afraid it would melt if I ironed it.
 Anyhoo, here are my napkins.  I used a cheapy fabric from the "quilting" fabric wall at Hobby Lobby so I made sure to wash it before hand because I knew it would shrink quite a bit.  The backs are a natural muslin.  I top stitched them with brown thread and tied them with some orange zig zag.  I thought they turned out very cute. 
Also, surprisingly, I had some pretty decent sales on etsy this past weekend.  NOT on CyberMonday but on Thanksgiving and the day after.  My sales - and so many other handmade shops sales have really tanked on etsy the past year or so.  Especially since Chinese/Asian factories are allowed to sell there out in the open now.  Before, etsy tried to pretend they were all co-ops but now they are all completely allowed.  

Etsy - your placed to buy made in China crap at a considerable markup than Walmart.

Anyway, the sales were a nice surprise.  I appreciate all my customers and I hope they all enjoy the items they buy from my shop.  I know some of these were gifts so I hope they are loved by all the recipients.

Ok, now for my reorganized fabric shelves.  This is the fabric I think of as my quilting fabric.  (I keep my fabric I use to make aprons for my etsy shop on different shelves in the closet)  I'm still building my stash but I'm getting there.  LOL  After I got home from the Houston Quilt Festival, I didn't want to mix in my beautiful new fabric with all the fabric that was such a mess on my shelves.  It was all just sort of jumbled together, not folded neatly, stacks here and stacks there.  Ug!  So, I set about organizing for that I could add the new stuff and be able to find it.
So  here is the BEFORE of my shelves:
And here is the after:

 I turned them long ways up then folded each piece of fabric the same way so they would be the same size.  I separated by color.
 My larger pieces of yardage - 1 yard or more - I wrapped around pieces of foam core board that you can get at the dollar store for $1.  I just cut the foam board up - unfortunately I didn't cut it all to be the same size.  That would have looked more uniform.  I may redo that in the future. 
My precut fabrics.  The top right shelf is my batik collection.  Top left are my solids.  Bottom left are leftovers from past projects that I don't know what to do with.  Bottom right is my etsy store project box.  Unfinished, half done things and fabric pulled for aprons.

It's much easier to find things now and it looks neater.  I'm trying to not buy anymore fabric until after the first of the year.  I'm thinking February.  Which is really not easy because fabric.com, pink castle fabrics, stash modern, etc are all having wonderful sales right now.  I think they're trying to kill me.  But I'm determined.  I have all the fabric I need for the projects I've started and need to finish by either Christmas or February (for the local quilt show).  So, I'm going to be strong and work on finishing - not starting.  

Help keep me honest you guys.  I really need to get some of this stuff finished.  

Thanks for reading my blog and stay warm wherever you are.  We are in an icy/freeze state in Texas right now and I know some places have it a lot worse.

**Linking up with My Quilt Infatuation**

Thursday, November 28, 2013

A Fall Table Runner - Quilty Finish

Last week I had to go to the grocery store - I don't usually go.  My husband does 95% of the grocery shopping.  But since I was there, I bought myself some flowers for my sewing room.  Pretty huh?

 Ok.  Down to the good stuff.  I have a quilty finish.  A fall table runner for my dining room.  I used Moda's Wrens and Friends mini charm pack for this and it was a breeze to put together.  I love those mini charm packs.
The colors look just fall enough and it has aqua in it which goes with my dining room.
 The cream strips are from a Moda jelly roll in Snow.  It matches nicely.  I also used the same jelly roll strips for the binding. 

 It's quilted with Aurifil 50 weight thread in color 2021 which is an off whitish/cream color.  I did a straight line grid quilting on it and I think it came out great.  Total measurements are 13 x 31 1/2 inches.
 The back is an orange pattern fabric from Robert Kaufman Metro Living.

Happy Thanksgiving everyone!  I have so much to be thankful for - although cooking on Thanksgiving is not one of them :)

**Linking up to crazymomquilts Friday finishes!**

Tuesday, November 26, 2013

Houston International Quilt Festival - Part 2

Welcome to the Houston International Quilt Festival 2013.  I'm not going to go over every detail or anything.  Just hit some highlights.

This is Ebony Love.  She was my instructor for the Modern QR code quilt class.  The QR (quick read) code is that little scanny thing that is on everything now.  You scan it with your phone and it gives info about whatever it's advertising.

So in this class, we started making one in quilt form.  Ebony was the most professional quilt instructor I've ever had.  Her instructions were all written down for each of the 4 quilts that we could choose from.  She even had them bound with a spiral.  Just that alone made her class awesome.  
We could choose between a gray or off white background and I got to class too late to nab a gray but that's ok because I probably would have chosen the white anyway.
When our quilts are finished they will look like a QR code.  Because they are in color, they won't be scanable but Ebony said that she will send us a label for our quilts that has the scanable bar code on it when we finish our quilt tops.  I'm working on mine now and hope to have it done in time to enter it in our local quilt show.
I really enjoyed all of the classes I took this year.  Not a stinker in the bunch.  I have pics on my phone of some of the other classes and maybe someday I'll get them loaded to my computer so I can post some.

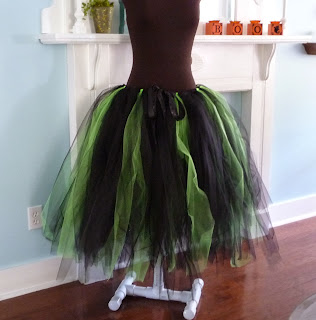
Here I am in my witches costume for Quiltapalooza.  I loved my tulle skirt.  But out of all the people there, about 80% were dressed as witches.  It occured to me that I could have made mine in pink and gone as a Barbie or something.  Maybe next year.  It was a fun party though.  Lots of great costumes and they gave away tons of prizes.  Unfortunately, no one at our table won any.  :(
This was my favorite quilt from the Modern Quilt quild display in the quilt show.  It is called Fireworks Quilt by Tara Faughnan, an individual MQG member.  To see all of the Modern Quilt Guild display, go here.

One of the classes I took was called Fifty Shades of Groovy By Leslie Tucker Jenison.  Her Fifty Shades quilt is one of the ones on display in the above link.  Her class was fun and she is a great teacher.

One disappointment I had was that the majority of the quilts seemed to be landscape quilts.  I love landscape quilts and art quilts but it seems to me that such a major show could have divided the categories up better.  Maybe have an equal amount of each kind of quilt.  I also wish the Modern Quilt display had been bigger.  It's quite a large movement at this point and I think there should be more recognition.  They did offer Modern quilting classes this year, which was a first.  I took as many of them as I could get into.  I'm hoping for even more next year.


Thursday, November 21, 2013

Houston International Quilt Festival Part 1 - Preparing to go

Sometimes I have so many things to say on my blog that I don't know where to start and I get overwhelmed.  That's why it's been so long since I posted.  I just didn't know where to start.

On October 29th (Tuesday) I headed down to Houston for the International Quilt Festival which is awesome by the way.  If you are interested in sewing or quilting and you have a chance to go, take it.  They have so many classes, so many quilts to look at and so many vendors to shop from.

Before I left, I made some prayer flags for the prayer flag swap that was taking place.  I had never made one before and honestly, I had to look them up to see what they even were.  My friend Robyn, who also went to the festival, told me all about the ones she had made and sort of talked me into trying it out.  (Thanks Robyn!! I had fun making them and hanging out with you at the festival!!)  So I ended up making 5 and here they are.

 I like to think of them as inspiration flags instead of prayer flags as most of them don't have anything to do with religion or prayer.  I'm not sure where they got their name but I like Inspiration flag better.
 There's too much light in all these pictures and it washed them out.  Ug!  Someday I'm going to master simple photography.
 I bought a sack of these old quilted hearts years ago and I still have some.  I just sewed it onto this batik fabric which looks like it was painted with water colors.
 More batik fabric.  I cut the passage about hope out of a fabric that I've had for awhile. 
 I sewed these sweet felt flowers onto some natural muslin and stamped it with a "sending happy thoughts" stamp. 
 This one says Poppy Garden.  I hand stamped that and sewed on the felt flowers and ribbon.  And of course buttons.  Everything needs buttons.
 A washed out close up view. 
 I also needed a handmade name tag holder.  I sewed this one up really quickly and attached all my pins to it.
 Half moon modern fabric on the front and Michael Miller stripe on the back.
 This year the festival took place over Halloween.  The had a party called Quiltapalooza.  It was a Halloween dress up party/dinner.  Lots of fun.  I made myself this fun skirt.  Guess what I went as.
Closeup.  There was lime green, black and black glitter tulle. 
In my next post, part 2, I'll show my whole costume with some quilt show pics.

Thanks for reading!

Monday, October 21, 2013

Halloween Quilt

Look what I finally got!  A Kona Cotton Color Card.  Say that 3 times really fast.  haha
I've been wanting one for some time and I love looking at it.  I think it will be really useful the next time I go to order solids.  I already have a list of the ones I want first.

And now for a quilty finish.  Ta da!  I finished the Halloween panel that my dh wanted me to quilt for him.  It's been hanging in his office doorway for about a week now.  He's already gotten compliments on it which makes me feel good.  It was a good chance for me to practice free motion quilting and also stopping and starting (which I really stink at) since I didn't have to piece it.
I did how ever, piece the back together with Halloween fabrics that I've had laying around for some time.  The orange is Kona Solid in orange.  I bound it with an orange fabric called Marble Swirls by Moda.  

Here is an up close and personal of the quilting.  I used a gray and black variegated thread from Sulky that is 100% Rayon.  I usually use polyester or cotton thread to quilt with but this is a wall hanging so hopefully, that thread will be ok.   I couldn't find the Mettler thread that I wanted at Hancock's and didn't have time to drive across town to my LQS.  I did this alien finger quilting on the big square in the middle and a meandering stitch on the rest.
 This is the first time I've done a meandering stitch and I have to say, I don't like it.  I don't see myself using it again anytime soon.  It was more difficult and time consuming than I thought it would be and not fun at all.  I was really wishing I had continued with the alien fingers but I didn't want to take out all those stitches to start over.  Live and learn.
Now for the finale.  A picture of my son this past Saturday on his 15th birthday.  He's the best kid in the world and I love him so much.
I'm getting ready this week for the Houston Quilt Festival which is next week.  This will be my second year to go and I'm sooooo excited.  I'm going for 5 days - although one is a half day which is Sunday and I'm coming home that afternoon.  I have classes scheduled every day and I'm trying to prepare for those.  Plus, I made something special that I will try to share later this week.

Thanks for dropping by and happy quilting!

**Linking up to Sew Many Ways**

Wednesday, October 9, 2013

WIP's for Wednesday - a quick update

It's Wednesday again and I thought I'd make a quick post to update the progress of some of my WIP's from this post.

WIP #1 was my Halloween quilt wall hanging that my DH requested for his office.  
I'm almost done with the quilting.  I thought I'd finish today but I had to shop at Macy's run errands.  I want to have it completely finished by Monday so he can take it to work.

My WIP #2 was to finish some items for my etsy shop and I did finish the stack I was working on but now it's time to start more.

WIP #3 was the homecoming mum which I finished and wrote about in my previous blog post.

WIP #4 was the stack of HST blocks that I have been slowly trimming.  When I last posted about them, they looked like this on my design board:
I've trimmed a few more and rearranged them and now they look like this:
One of the first modern quilts I saw was a version of this but in Christmas fabrics by Basic Grey.  I LOVED it and have wanted to make one ever since.  I'm not for sure that these blocks will stay like this but I'm really liking it so far.

WIP #5 was my cross quilt.  I haven't made anymore blocks for it although I do have a stack of fabric waiting for me to cut it so that I can make the final 6 blocks.

And of course, now I have a WIP #6.  
I've started a fall table runner using a stack of mini charms called Wrens and Friends by Moda.  I don't have a fall table runner and I thought I could whip this one up while it's still fall.  Especially since we, just this week, started having temps below 90 degrees. 

That's my progress this week on my WIP's.  I've got my fingers crossed that I will actually have a finish soon.  Maybe. 

*linking up with WIP Wednesday at Freshly Pieced**


Monday, October 7, 2013

Homecoming Mum - Texas Style

In my last blog post, I mentioned that Homecoming week was coming up at my son's school (it was last week).  Therefore, it was my responsibility to make (or buy) a homecoming mum for his lovely date that he had asked to the Homecoming dance.  He's only a freshman and this was his first time to ask a girl to be his date.  It was a very nerve wracking time.  Her name is Claire.
In my quest to find instructions and ideas on the internet on how to make a mum, I discovered that not everyone celebrates Homecoming week or wear huge, giant mums on their chest.  Apparently, it's a Texas thing though I did discover that a few other states do it too like Oklahoma, Louisiana and I think Arkansas.  I had no idea that this wasn't something that everyone did.  I grew up in Texas and I never really thought about what other states did for Homecoming.

Anyhoo, in Texas the girls wear mums bigger than their heads (usually given to them by their dates or by their parents) and the boys wear garters on their arms that are a smaller version of the girls (given to them by their dates as well).
So, I thought, I'm crafty.  I can make the mum.  And so I did.  And it turned out WAY better than I thought it would.  I didn't make one of the giant ones - it wasn't bigger than her head.  It was about the same size as her head (lol).  Some of the mums are so big and heavy that they have to be worn with a ribbon around their necks instead of pinned to their shirts.  Some have 12 or 15 flowers on them and they light up.  Can you believe it?  I just thought it was nuts.

I was determined to make a normal size tasteful mum.  So, I set out to Hobby Lobby and proceeded to buy one or two of everything they had in the mum making department.  I have enough stuff left over that I can make one for next year.  I think I might have over bought, eh?  HaHa
Here are the up close and personal pictures of the finished product.
 
 My dear friend Robyn who is a veteran mum maker, told me to be sure and shop the scrapbooking sections and the Christmas department for anything that I could use.  Lots of times it's cheaper in those areas than in the mum making section.  I got the green sparkly ribbon in the Christmas area and then wrapped it around the white ribbon.  I also got the sparkly C in scrapbooking.  (thanks Robyn for all your great tips!!)


 Sparkly silver footballs. 
Some people make the mums out of other colors like maybe the girl's favorite color or they use a theme or something.  Since this was my first time, I just stuck to the school colors of green and white.  Also, it's very popular to attach a stuffed animal into the center of the flower.  I thought her initial was prettier and classier.
 The white ribbon says "class of 2017" and I made the green and white loopy ribbon and spelled out Homecoming 2013 in silver sparkly letters.  You can see some of the trinkets that are attached in this picture. 


 Lots more trinkets, lots of ribbon.  I used silver glitter jingle bells from the Christmas dept.
 I hand applied this silver scrollwork to the white ribbon one Friday night while my DH and son were at a football game.

 The green ribbon has silver letters that spell out "Claire" with glitter stars and footballs.
And here is the whole end product.  It was about 3 1/2 feet long and was a lot heavier than I thought it would be.  I finally just had to make myself stop adding things to it.  
This is my son's garter which Claire gave to him.  The tradition is for the boy and girl to wear their mums at school all day on Friday and then to the football game that night.  The homecoming dance was on Saturday and they don't wear them to the dance.  

It was such a fun week for the kids and I'm so glad a good time was had by all.  AND, the football team won their homecoming game which just made everyone more festive.

And that, my friend, is how you make a homecoming mum in Texas.  :)

**Linking to Quilt Story - see button on side bar **